
Well this didn’t really go as planned………
I started this project thinking it would be cool to build a couple of guitars completely from reclaimed pallet wood. I found a couple of pallets that had the materials I needed, and began breaking them down. These pallets had a lot of different types of wood. There were some pine 2×8″s, hardwood 4″x4″ runners, and both 1″ hardwood and softwood top pieces. Some of this I’d use for the guitars and some I’d use for other projects around the shop.
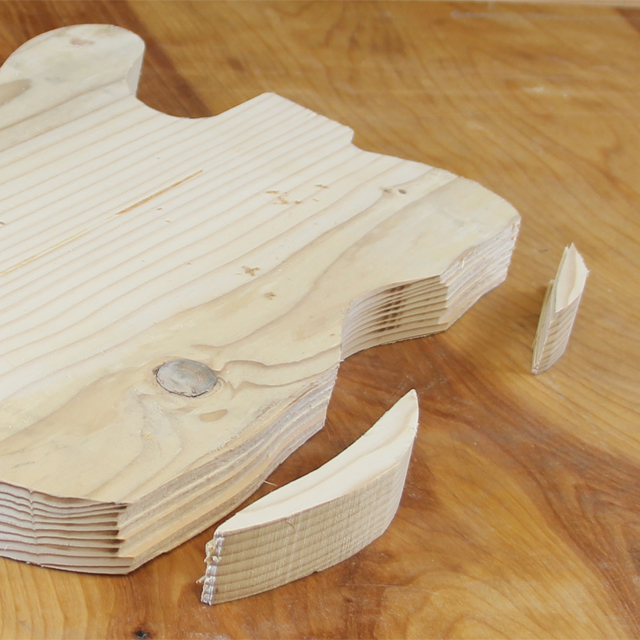
After pulling all the nails I began machining some materials. I glued up the body blanks from the 2×8’s material. Since they were only 1.5″ thick I decided I would make a top and glue it on to make up some of the thickness. For the necks, I also glued up some pallet boards. When the body blanks were ready, I rough cut them on the bandsaw to remove most of the waste material. Now on to the router table. Up until now, things had been going pretty well for this project, but little did I know, things were about to change. Apparently, the wood on one of these bodies wasn’t as solid as they appeared to be. As soon as the router bit hit that area, 2 large chunks of the body flew right off. Yep, rotten, spongy boards. This body is no good. Thats OK, I have another. Lets keep going.
The second one went fine, I was able to rout it out without issue. Before I glue the top on, I wanted to rout out the insides of the control cavity and pickup holes. I put the piece on the drill press and began removing some of the material with a forstner bit. Enter mistake #2. It was my intention to make this a right handed guitar from the beginning. Since I am left handed, I never noticed that I had the drilling set up for a lefty guitar and began drilling. No big deal I guess. Now its a lefty. Lets continue. Time to glue on a top. I applied some glue, and clamped my top using what I thought was enough clamping blocks to apply enough pressure. Once the glue dried, I realized that the top wasn’t secured to the body well. There were several gaps in my glue line. This was not good enough to continue with this project. This was strike 3.
So what did I learn from this project? There are several things.
#1. You must use solid material. This may seem obvious but apparently its not. I did not see any rotted wood when I started. I will now examine the material much closer.
#2. Pay attention to the orientation before making any cuts. Know exactly where everything is going to go. I have since written notes like this on my templates as a reminder to pay attention.
#3. If you are hoping that you clamped things well, you probably didn’t. You must be absolutely sure of your work. When in doubt, add just a touch more glue, a few more clamps, and even more clamping cauls.
#4. Know when to stop. Now I could have continued with this project, and I will, just not in this video. I will not scrap this body. I’ll likely end up removing the badly glued top and using another one to finish the build. I’m just not going to do it in the video. After strike 3, its time to stop.
Have you ever had a project turn out like this? Let me know your experiences. In the meanwhile, have a look at the video and learn from my mistakes.