
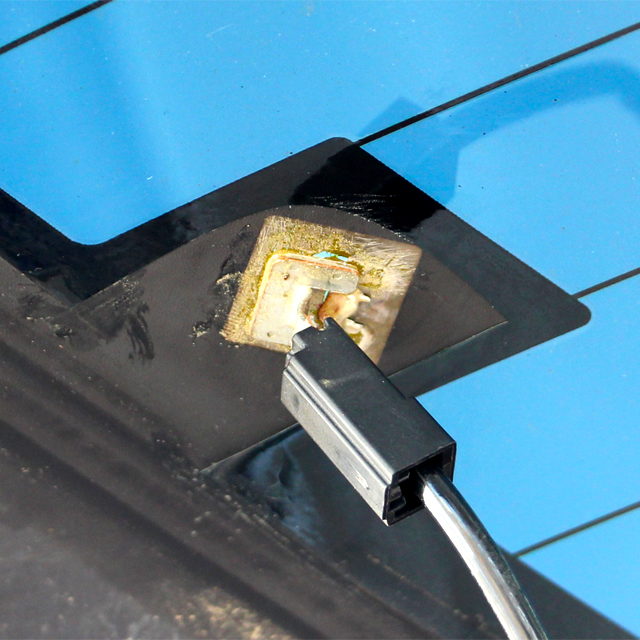
Here’s a project that came out of my Prepare for Winter video. I found that my Rear Defroster wasn’t working. Upon further inspection, I found that the tab that connects the wire to the window had broken off. After researching the best way to reattach it, I found this cool 2 in 1 kit from Permatex. This kit is great for me because after I repair this tab, I need to fix a few grid lines on our other vehicle. Stay tuned for that video as well.
The first step in this repair was for me to wait until we had a really nice day. The instructions say that the temperature should be above 50 degrees. That doesn’t come very often here this time of year, so at the first sign of a warm day I was out getting it done. Of course if you have a garage and some way get a little heat in it, this shouldn’t be a problem. I first began by taking the sandpaper included in the kit, and cleaning off the metal tab and very lightly cleaning the reattachment point on the window. Now, using the alcohol cleaning pad I cleaned the tab and window surface. I was very careful not to touch these after wiping them off with the alcohol. Now I can carefully open the activator pad and using the foil pack as the handle, I can wipe the activator on the window. Do not wipe the activator on the tab. Once the activator has been applied, you have to wait for it to sit for at least 2 minutes, but not more than 15. Now grab the little adhesive pack, and begin mixing it by kneading it in your fingers. It should become an even beige color. After kneading it for a couple minutes, cut open the pack and squeeze out some on the surface of the tab. The instructions say to add one drop, but mine came out really fast and I know I had a lot on there. It still worked out. Now, carefully stick the tab in place on the window, and hold it firmly for one minute. After the tab is attached, you MUST let it cure for 24 hours before turning on the defroster. I didn’t even reconnect the wire until the next day.
The next day, I brought out the multimeter and checked for continuity between the 2 tabs on the window. This was good. Next I turned on the defroster and immediately felt the window heating up. Using a test light, I tested for voltage at the tab and it was 12volts. Perfect. The repair is a success.
This little kit worked out great. I am happy to have the defroster back up and running.
Check Out the Video of the process.
— Affilliate Links to Recommended Products —
Permatex Complete Rear Defroster Repair Kit – https://amzn.to/2PgO3G2
Permatex Tab Adhesive only – https://amzn.to/33NwhiJ
Lisle Test Light – https://amzn.to/33RlT9T
Fluke Multimeter (newer than mine) – https://amzn.to/34YST0U